Spring 使用简单Demo进行源码调试(一)

版权声明:本文为博主原创文章,转载请注明出处,谢谢!

版权声明:本文为博主原创文章,转载请注明出处:http://blog.jerkybible.com/2015/05/08/Spring 使用简单Demo进行源码调试(一)/

访问原文「Spring 使用简单Demo进行源码调试(一)

第一步
在源码调试之前,需要将spring源码进行编译,这里选择的是3.2.x版本,这个版本在导入eclipse都会出现bug,但是不影响目前的调试。

第二步
将编译后的源码导入eclispe,如下图所示:
spring源码导入eclipse
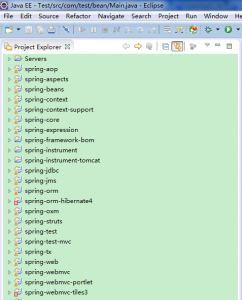
可以看到有两个工程报错,分别是spring—orm-hibernate4和spring-webmvc-tiles3,暂且不去管它,因为目前不会影响到后续的源码调试。

第三步
新建一个工程,Test,然后右键该工程,选择Build path -》 Configure Build Path…,然后把当前所有的没有报错的工程加入到Projects里,如下图所示:
加入未报错工程

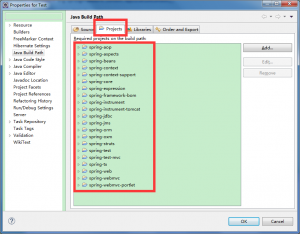
新建一个pojo类,Animal,代码如下

1
2
3
4
5
6
7
8
9
10
11
12
13
14
15
16
17
18
19
20
21
22
23
24
25
26
27
28
29
30
31
32
33
34
35
36
37
38
39
40
41
42
43
44
package com.test.bean;
public class Animal {
private String name;
private int age;
public String getName() {
return name;
}
public void setName(String name) {
this.name = name;
}
public int getAge() {
return age;
}
public void setAge(int age) {
this.age = age;
}
public void info() {
System.out.println("name:" + getName() + " age:" + getAge());
}
}
```java
新建一个Main类,代码如下:
```java
package com.test.bean;
import org.springframework.context.ApplicationContext;
import org.springframework.context.support.ClassPathXmlApplicationContext;
public class Main {
public static void main(String[] args) {
ApplicationContext ctx = new ClassPathXmlApplicationContext("bean.xml");// 读取bean.xml中的内容
Animal a = ctx.getBean("animal", Animal.class);// 创建bean的引用对象
a.info();
}
}

新建一个bean.xml,代码如下:
xml <?xml version="1.0" encoding="UTF-8"?> <beans xmlns:xsi="http://www.w3.org/2001/XMLSchema-instance" xmlns="http://www.springframework.org/schema/beans" xsi:schemaLocation="http://www.springframework.org/schema/beans http://www.springframework.org/schema/beans/spring-beans-3.0.xsd"> <bean id="animal" class="com.test.bean.Animal"> <property name="name" value="mao" /> <property name="age" value="12" /> </bean> </beans>xml

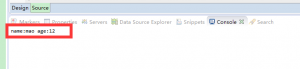
第四部,运行Main.java,可以看到如下运行结果:
运行结果

Jerky Lu wechat
欢迎加入微信公众号